There are 11 tabs that are useful in configuring the DX cluster options.
A DX cluster is a server, usually on the Internet, where hams around the world participate in a form of "crowd-sourcing." That is - hams around the world share information about where they hear active DX stations on-the-air with other hams connected to this network. Using the functionality in Logbook, the operator can select a DX spot and the radio will automatically tune to that frequency and mode, the rotator will direct the antenna in the direction of the DX station, callsign lookup features populate information about the DX station's licensee, and the computers date and time are populated in the QSO. All the operator needs to do is work the station, save the QSO, and move on to the next one.
The DX Cluster pane is displayed in the default layout as shown below. You can also find the DX cluster pane by clicking on View > DX Cluster > Display:

Once the DX Cluster pane is displayed, there is a "Connect" button in the upper left of the pane that is used to connect to the DX Cluster network (shown above as "Close", which is the condition shown when a connection is already made).
Connection
The first step in using the DX cluster feature is to configure the connection.

- This tab provides a list of DX cluster nodes around the world.
- NOTE: We recommend using the WA9PIE-2 node because it has the most complete country data that is automatically updated and it has the best uptime availability of any DX cluster node in the world. WA9PIE-2 is normally connected to as many as 30 peer cluster nodes around the world. This enables WA9PIE-2 to provide the most complete list of spots to the operator without the need to surf around to other cluster nodes.
- In the upper left, the user can select:
- Connect on startup - this makes the DX cluster connection when Logbook starts
- Reconnect if connection lost - this causes Logbook to automatically attempt a reconnect, if the connection to the cluster node is lost (generally due to local network connectivity issues)
- Reset Spots on Connect" - this option provides a choice for whether or not the list of spots is discarded when a connection is made to a different DX cluster node. This is useful when the operator desires to collect some spots from a standard DX cluster node, then also collect some spots from a skimmer node, and display both or clear them.
- Operators can also add a DX cluster node by clicking the Add button and then entering a Title, (IP) Address (or DNS name), an IP port, and a username and password where applicable.

Appearance

- This tab provides the ability to change the fonts and row colors in the DX cluster pane.
Layout
The layout options are a very important component of the DX cluster pane. This enables the operator to select the fields that will be included as columns in the DX cluster display.

- The left hand side of this tab shows the available information fields that can be included as columns in the DX cluster display. The right hand side shows the selected fields that will be included in the DX cluster display. A explanation of the purpose and use of the column can be found in the Description box after clicking on any of the available (Selected or Available) columns.
- The selected fields can be arranged in the display by using the up/down buttons above the selected fields.
- NOTE:The following guidelines define the source of the data that is being displayed.
- Fields that begin with "Spot" display data just as it was received by the DX cluster node without modification. Logbook is not the source for this information.
- Fields that begin with "HRD" display data that is derived by Logbook, based on data in the DX spot and information available within Logbook. The DX cluster is not the direct source for this information.
- Fields that begin with "WSI" provide an indication about whether that country or station has been worked or confirmed in the past. (see WSI - Worked Status Indicators below)
- Fields that begin with "Member" provide information about whether or not that station is known to participate in LOTW or eQSL. (QSL Member will be explained in more detail in a section to follow.)
- Fields that begin with "Worked" displays information from the log regarding what bands or modes the spotted station's country has been worked in the past.
- There are lots of options here for obtaining rich content from the DX cluster network and displaying it so the operator can make decisions in real-time about what DX to chase and what pile-ups to jump into.
Selection
The Selection tab defines the behavior of Logbook when DX spots are selected from the DX cluster pane.
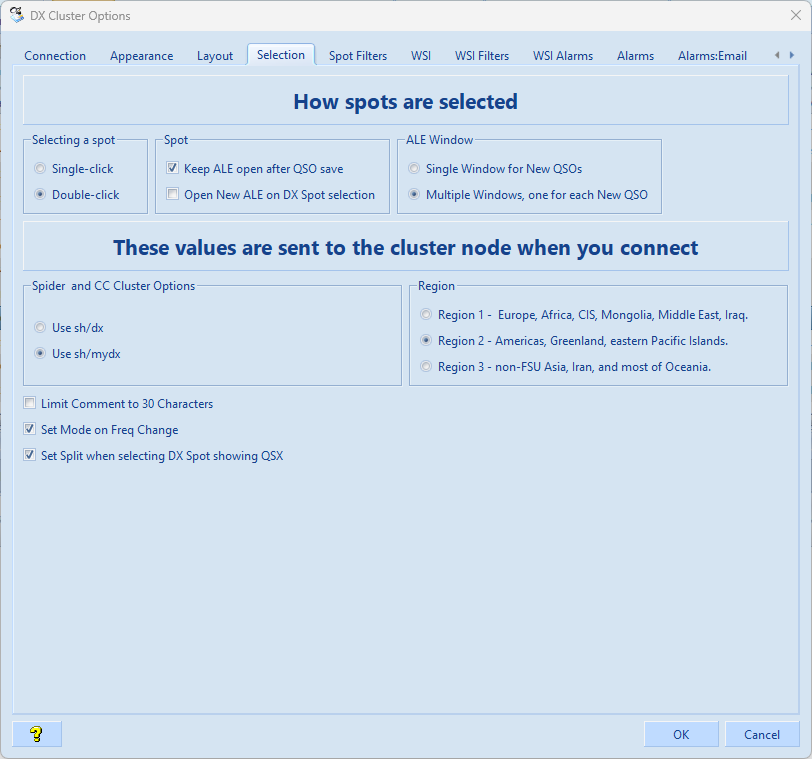
Selecting a Spot
- There are two choices for mouse click behavior in DX cluster.
- When Single-click is selected, Logbook will (a) invoke the callsign lookup for the Lookup Pane (b) populate the open ALE with information about that spot, and (c) tune the radio to the frequency and mode of the spot, based on the options selected in the lower right of this dialog box when the operator clicks once on a DX spot.
- When Double-click is selected, Logbook will (a) invoke the callsign lookup for the Lookup Pane (b) populate the open ALE with information about that spot, and (c) tune the radio to the frequency and mode of the spot, based on the options selected in the lower right of this dialog box when the operator double-clicks once on a DX spot. With Double-click selected, a single-click will only invoke the callsign lookup for the Lookup Pane.
- NOTE: We recommend using the "Double-click" because this enables the operator to use a single-click to quickly populate the Lookup Pane.
The "Selecting a spot", "Spot", and "ALE Window" options work together. You should consult the following table to configure it for your needs. (added in releases av6.9.0.18152 and later)

ALE Window
- This option defines whether or not Logbook is allows to open multiple ALE windows.
Spider and CC Cluster Options
- This is a very important, but often over-looked, feature.
- DX cluster nodes have the ability to filter spots before they are sent to you. This is a good idea, given that there's not a real good reason to receive 160m spots from Greece at 3pm in Chicago. So operators can setup DX cluster filters - on the DX cluster node itself (not within Logbook) - keep reduce the "noise" of irrelevant spots. For DX Spider and CC cluster nodes, the command "sh/dx" sends the first "lot" of spots (quantity specified in the Connection tab) unfiltered. The "sh/mydx" causes the initial "lot" of spots to honor the filter options that the operator has set directly on the DX cluster node. Given that - in the absence of filters - these two commands have the exact same behavior, we strongly recommend using the "sh/mydx" option.
- Region is where you select your ITU region. This invokes the appropriate "band plan" for your location.
- The option boxes on the right enable you to turn on or off the automatic rig tuning for frequency, mode, and QSX (and reset split, which are strongly recommended except for DX station).
- "Limit Comment to 30 Letters" causes the comment field in the spot to be truncated at 30 characters.
Spot Filters
NOTE: Before continuing, it's important to distinguish the difference between "server-side" filters and "client-side" filters.
- "Server-side" filters are created by the operator, outside of Logbook, on the DX cluster node itself. These filters prevent spots from being sent to Logbook. These are most useful when the operator desires prevent spots from a geographically irrelevant part of the world to come to Logbook. These types of filters will not be discussed in this manual. The following resources are online and available to explain "server-side" filters in more detail:
- DX Spider Filtering Manual: CLICK HERE (including WA9PIE-2)
- CC Cluster Filtering Manual: CLICK HERE
- AR Cluster Filtering Manaul: CLICK HERE
- "Client-side" filters; The spot filters in Logbook are "client side" filters. They work by "hiding" spots that have been received from the DX cluster node (server) into the DX cluster pane in Logbook. This guide will focus on how these filters work in Logbook.
The Spot Filters tab enables the operator to create filters for the data being delivered to the DX Cluster window (ie. after the application of server‐side filters). These filters are displayed in the dropdown menu in the DX Cluster window.

- Logbook contains the most common filters. Operators can create additional filters on their own using default filters as their guide.
- One useful filter to create is a filter that combines HF frequencies with 6m (given that many modern HF rigs include 6m). To create this one either click Add or select the HF filter and Copy, then Modify:

- Name the filter "HF + 6m", enter the "Freq min" and "Freq max" values (in MHz) of 1.800 and 54.000. Set the "Max entries" to a desirable number. Then click "Ok".
- The Up/Down buttons enable the operator to arrange them in the desired order in the dropdown list (which will be covered in more detail in the DX cluster section of this guide):
WSI
This tab is described in detail here - Worked Status Indicators (WSIs) Conceptual Detail
WSI Filters
WSI Filters are the method for hiding everything except those things you are hunting for.
Because Logbook "knows your log", the WSI Filters automatically automatically hides DX spots except for the stations you need, based on your selections.
As shown below, you can individually set alarms based on entity type or criteria.
There are three criteria - ATNO (All-Time New One), Band, and Mode (this is modegroup - phone, CW, and digital).

Further, you can decide to hide LOTW users, eQSL users, or stations that are already in your log for that band and modegroup (B4).
WSI Alarms
With the addition of WSI alarms, it is no longer necessary to maintain a list of "needed stations."
Because Logbook "knows your log", the WSI alarms automatically alert you to stations you need, based on your selections.
As shown below, you can individually set alarms based on entity type or criteria.
There are three criteria - ATNO (All-Time New One), Band, and Mode (this is modegroup - phone, CW, and digital).
With these alarms enabled, the actions shown below are taken.

"Skip Alarms for Initial Bundle of Spots on connect"; Use this in-particular if you're just starting your chase. When you connect to the DX Cluster, you're going to get some number of DX spots (100 or more in some cases). Without this checked, you will get flooded with the notifications enabled below.
"Skip Alarms for callsigns that are already in the log (B4 - Callsign is in the log for Band and Modegroup)"; Use this to prevent alarms from refiring once you already have a given call in the log on a particular band and modegroup.
Alarm Notifications (actions) include (instructions found below):
Text to Speech
Light pole (click here for instructions on installing the Embrava Blynclight)
UDP Light-pole (being depreciated)
DX Cluster Alarms
The operator can setup alarms that will alert them by E-Mail (including a text message to a cellphone), Text to Speech, or with the Lightpole.

- The example above shows how to create a number of alarms for needed countries and zones. To build an alarm, click Add to bring up the following Add/Modify Alarm Definition dialog box.

- As an example, we'll build an alarm for a callsign that will be operating from Kerguelen.
- Give the alarm a name in the Title field, we'll use "Kerguelen"
- Enter the specific callsign we want an alarm for in the Callsign field.
- Enter the interval in minutes for which alarms can be sent.
- Select the delivery options from the Options below
- Click on the box to the left of "Enable"
- Then click "OK"
- The new alarm is now active.
Alarm E-Mail
This tab enables the operator to configure Logbook to send alerts via email (per the alarms enabled in the Alarms tab).

- There are a number of pre-populated options for sending email. They include - AOL, Gmail, Hotmail, Yahoo!, MSN, Lycos, Mail.com, and Netscape. The dropdown box populates the required information.
- NOTE: If using Gmail, Google requires that you change a setting in your email account to allow "Access for less secure apps". Google this phrase for additional information.
- You will need to enter the username and password for your selected email account in the fields provided.
- Add your email address into the "Outgoing e-mail address (from)" field.
- Add your destination email address in the "Outgoing e-mail address (to)"
- TIP: It is possible to send directly as a text message to your smartphone. For example, Verizon Wireless smartphones would be addressed at <your phone number>@vzwpix.com. Check your carrier for your specific details. The reference for sending to your phone's SMS or MMS email address, please click HERE.
- You can test this by clicking the "Send Test" button.
- Click "OK" to complete the setup.
Alarms:Speech
This table enables the operator to configure speech alarms from your computer speakers.

- Select the desired options and click "Speak" to test them.
QSL Members
When viewing the DX cluster, it's desirable to know whether the spotted station participates in Logbook of the World or eQSL (explained further in the DX cluster section of this user guide).

- The eQSL and LOTW import URL fields are shown with Reset buttons.
- NOTE: We strongly recommend that you do not change these URLs unless instructed to do so by HRD Software, LLC. In case they are accidentally changed, the Reset button will set them back to their original URLs.
- The two rows show the number of callsigns in the eQSL and LOTW files that have been downloaded.
- The Update button forces an immediate update.
- NOTE: We recommend using both the eQSL and LOTW boxes for "Auto" and that you do not check the "Ask before doing automatic updates" box. This will ensure that Logbook will check for updates each time you launch Logbook without being prompted.
Making a Connection to the DX Cluster
To make a connection to the DX Cluster, select a node from the drop-down (we recommend WA9PIE-2) and click "Connect".

Once you are connected, you will see the DX spots that come from the DX cluster as follows:

Was this article helpful?
That’s Great!
Thank you for your feedback
Sorry! We couldn't be helpful
Thank you for your feedback
Feedback sent
We appreciate your effort and will try to fix the article